Ah, good ole’ tomato sauce. Undeniably delicious. But also a little basic and after a while, ehhh, you need something more exciting.
If you’ve been stuck in a rut when it comes to sauce, red bell pepper, tomato’s relative, makes a delicious alternative! My local market was having a special on red peppers, so this is a good thing to make when you’ve got lots of peppers!
We’re also going to be adding vodka to our sauce which will bring out even more flavor.
The filling is a ricotta base mixed with your new favorite summer green: Malabar Spinach. Of course, there’s no reason you couldn’t use true spinach or some other green — feel free to experiment!
For the Sauce:
Hardware:
- Oven with broiling capabilities
- Full sheet pan
- Metal bowl big enough to hold all your roasted peppers
- Sharp knife and cutting board
- Sauce pot
Software:
- 12 red peppers
- splash of olive oil
- 2 T butter
- 2 medium onions, diced (about 3 cups)
- 2 tsp salt, divided
- 2 bay leaves (fresh if possible, but dried is OK, too)
- 4 garlic cloves, minced
- 1/2 tsp hot red pepper flakes
- 1/2 cup vodka
- black pepper to taste
- 1 cup chicken stock (homemade if you have it!)
- 1 cup cream
Let’s get cooking:
Set your oven to broil on the high setting.
Now, take a big bowl and put all your washed peppers into it. Drizzle a little olive oil on them and give them a toss to get evenly coated. Keep them whole. Don’t cut them or prick holes in them or anything; You’ll find out why in a minute.

Now place a large sheet pan on the bottom rack of the oven, this is to collect any of the olive oil or juices that drip off the peppers while they’re roasting.
The top rack is where you’re going to put your peppers. You want them close to the heat source, but not so close that they’re directly touching it.
Broil until skin begins to char, about 2 minutes. Watch carefully as they will burn quickly. When skin begins to blister, turn the peppers over and broil another 1-2 minutes (again, watch closely).

You don’t want them to be completely blackened, just a little bit of charring on the skin. That high heat is gonna deliver some great flavor and we’ll be removing the skins from the peppers anyway.
Now, while they’re still hot, immediately place the roasted peppers into a bowl, and cover with plastic wrap. Let this stand for about 10 minutes. What this does is it allows the residual steam and heat to “sweat” the charred skin off of peppers and makes peeling much, much easier.

At this point, you might want to take out the hot sheet pan we used to keep our oven clean. Don’t leave an empty pan with oil on it by itself under a hot broiler! There really isn’t a great way for that story to end.
Meanwhile, mis en place the aromatic ingredients for the sauce: Chop your onions, mince your garlic, and pick your bay leaves.


Note: there is some contention about whether fresh or dried bay leaves are superior… smells like a future article. In the mean time, I’ll just say that I use fresh bay leaves from my tree all the time and I definitely prefer them to the dried ones.
Also measure out the vodka and red chile flakes while you’ve got time.
Okay, by now those peppers should look shriveled and wrinkly. If they are, they’re ready to peel!

You’ll want to put the roasted peppers into a large strainer in your bowl. Split and drain the peppers and take out the seeds and stem. To remove the skin, just rub it off, it will seperate from the fleshy wall of the pepper. If you want to be technical, you’re removing the exocarp from the mesocarp.
This magical elixer we have reserved in this bowl is the reason we left our peppers whole to roast them. If we were to hack, chop, slash, or poke the peppers in any way, all of that precious liquid, which we call “pepper tears,” would be lost.

We’re going to reserve this to add later so we don’t miss out on any of that flavor.

Coarsely chop up the peppers and load them up in a bowl so they’re ready to go.

Put a large saucepan over medium-low-ish heat, once the pan is hot add the butter. You can even add the extra olive oil you captured on the sheet pan from when you roasted the peppers — three cheers for frugality!
When you’re cooking, you want a hot pan before you add the cooking fat, whether it be plant or animal based. Then you want to allow enough time for the fat to heat up before you add the ingredients you’ll be cooking. You never want to just dump everything in at once to a cold pan and then turn the heat on.
We’re going to be sweating our onions. And yes, that’s a technical term.
What?? Onions can sweat?
Indeed they can. Sweating is not the same as sauteing, in that sauteing is done at a high temperature for a short time with a relatively small amount of fat. Sweating on the other hand, is similar but at a lower heat.
(A low heat high fat cooking method is confit, and a high heat high fat cooking method is deep frying)
So as we’re heating up our pan, and subsequently heating up our oil, make sure that the heat isn’t too high, or you’ll end up sauteing.
Enough of my tangent, let’s get back to those onions. Heat up your pan, heat up your oil, and then in go those nicely mise en place-d onions.

Now, add some salt! The salt does two things. Primarily, it’s going to pull water out of the onions. Secondly, it’s adding a layer of seasoning. One of the differences between good food and great food is the seasoning! When you season in layers, the individual components harmonize so much better. You can’t really just go add a bunch of salt at the end of cooking or worse, at the table out of a little salt shaker. It’s just not the same.
In addition to the salt and onion, this is when I add my bay leaves.
Strange, you say? True, in the European cooking tradition, bay leaves are usually added during the moist-heat portion of the recipe. I, too, used to only add bay leaves once I had some liquid component.
Until one day, I was reading a cook book about Indian cuisine, and in nearly every recipe the bay leaves were added while the aromatics were cooking. If any culture knows about spices, it’s Indian! Long story short, I tried it and never looked back.
Cook until onions are starting to lightly brown, about 3-5 minutes. Technically when you’re sweating vegetables you aren’t supposed to get any color on them, but a little caramelization never hurt anybody.

Now, add the garlic and red pepper flakes. Cook until garlic is fragrant, but keep an eye on it as garlic can easily burn.
Add the peeled chopped peppers, as well as black pepper, a little salt. Cook about 5 minutes, stirring fairly frequently.

Remove from heat, add the stock. This should cool it down enough for the next step.

Now we’ll be blending everything — but be sure to remove both bay leaves or you’ll be sorry. (And so will your dinner guests).
Return blended sauce to pot and simmer, covered, for at least half an hour. Longer would be better.

About 10 minutes before we’re ready to use the sauce add the vodka. Vodka is going to enhance the release of chemicals like fruity esters from our ingredients.
Just before we’re ready to use the sauce were going to add some cream.

Herb time! I’m adding some chopped basil and cuban oregano (I have cuban oregano in my herb garden and I love using it, but any type of oregano will work)


Now, something you should be aware of when you’re using fresh herbs is that you don’t want to add them early on in the cooking process. If we added our herbs before that long simmering time, all the vibrant flavors they bring to the party would have been cooked out.

Now, lets talk filling. here’s what you’ll need:
For the Ricotta Filling:
Hardware:
Saute pan
Potato masher
Software:
2 cloves garlic, minced
4 cups densely packed Malibar Spinach
1 T oilive oil
12 oz whole milk Ricotta
1 cup whole milk Mozzarella, shredded
4 oz cream cheese or Mascarpone
1/2 cup Parmesan cheese, grated
1 T fresh basil, chopped
1 egg plus 1 egg yolk
1 tsp honey
1 tsp salt
1/2 tsp black pepper (or more to taste)
Let’s get cooking:
Start by harvesting and processing your Malabar Spinach. Read my souffle recipe for more details. Wash, spin, and measure the leaves.

Give it a saute in oil with a little garlic and a pinch of salt.

Make sure that the Malabar Spinach leaves are as dry as you can get them. See all the water that’s already coming out of the leaves? We don’t want to add to that.
Speaking of water, now would be a good time to get some water going to parboil the pasta shells. Make sure your pasta water tastes like the ocean!
Once the water evaporates, your Malabar spinach is ready; It’ll look like this. Set it aside while you work on the other components

Blend ricotta, eggs, cream cheese, grated cheese and shredded cheese. In terms of cheese, grated Parmigiano Reggiano and whole milk low moisture Mozzarella would be my picks.

Next step: eggs. I left one of the eggs whole but separated the other and only added the yolk.

Add some chopped fresh herbs as well.

I like using a potato masher to mix everything up.

Add honey, salt and pepper.

Add your reserved spinach.

Fold it in and you’re ready to go!

Awesome — the filling is done. By now your pasta water should be at a rolling boil so add your shells and cook them, but not all the way! Stop short of al dente so that the pasta doesn’t overcook in the oven.
I was going to add a picture, but it was so steamy that you couldn’t really see much. I’m sure you know how to boil pasta right? Right.
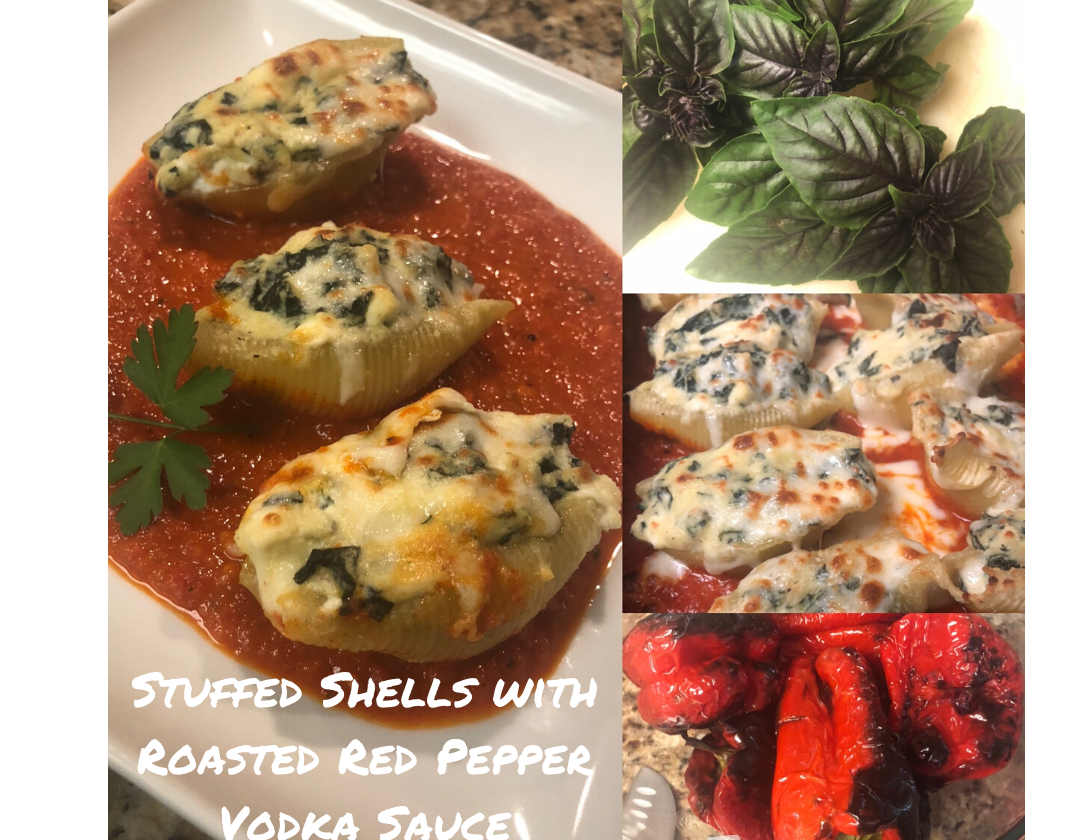
Pour some sauce into a lasagna pan to coat the bottom, then you can start filling your shells and placing them in the pan.

Tah-Dah!

Top with some extra shredded cheese.

Bake at 425 for about 15-20 or until the cheese melts and they look like this:

Enjoy! You can serve it family style or plate up individual servings.

I realize that this recipe is enough to feed an army, so I’ll probably be adjusting the amounts soon.
It’s gotten so cold the past few weeks that there’s practically no Malabar Spinach left, but if you’ve got any frozen you can still use it.
I hope you enjoyed the recipe and add it to your repertoire of uses for this bountiful and nutritious green.
This wraps up Malabar Spinach, but join me next time for a new plant of the month!